All-in-One card
The All-in-One card combines multiple card applications (PANs) into one physical card. In practice, this card product can combine things like lunch allowances, mobility budgets and travel expense cards – all into one physical card. This makes life easier for the customer as they only need one card with one PIN code.
Even though the card applications are consolidated into one physical card they are separate, allowing you and your customer to set custom spend controls for each card application and make changes to them in real time. It is also possible to manage which card applications (PANs) are enabled per physical card and add or remove them without having to issue new physical cards when changes are made. Each card application (PAN) is linked to its account which holds the balance, so funds are always taken from the correct ledger.
When using digital wallets, such as Apple Pay or Google Pay, the customer will see each card application as a separate digital card and can choose to use any of them just like they would with any other cards. Each card in the digital wallet can be set up to have a unique look which makes it easy for the customer to find the correct one when making a purchase.
Key benefits of an All-in-One card
- Make the customer’s life more convenient and easy by reducing the number of physical cards in their wallet.
- Fewer numbers to memorise, as all cards have the same PIN code.
- With each application having its own ledger, you can effortlessly separate different balances, e.g. lunch and wellness benefits.
Use case examples for All-in-One card
- Combining several different employee benefits into a single card (e.g. lunch, wellness, commuting, etc.)
- Expense management card with employee benefits as an additional card application
- A card thay has a separate application for fuel and another for expenses
- Debit and credit in one physical card
Creating an All-in-One card
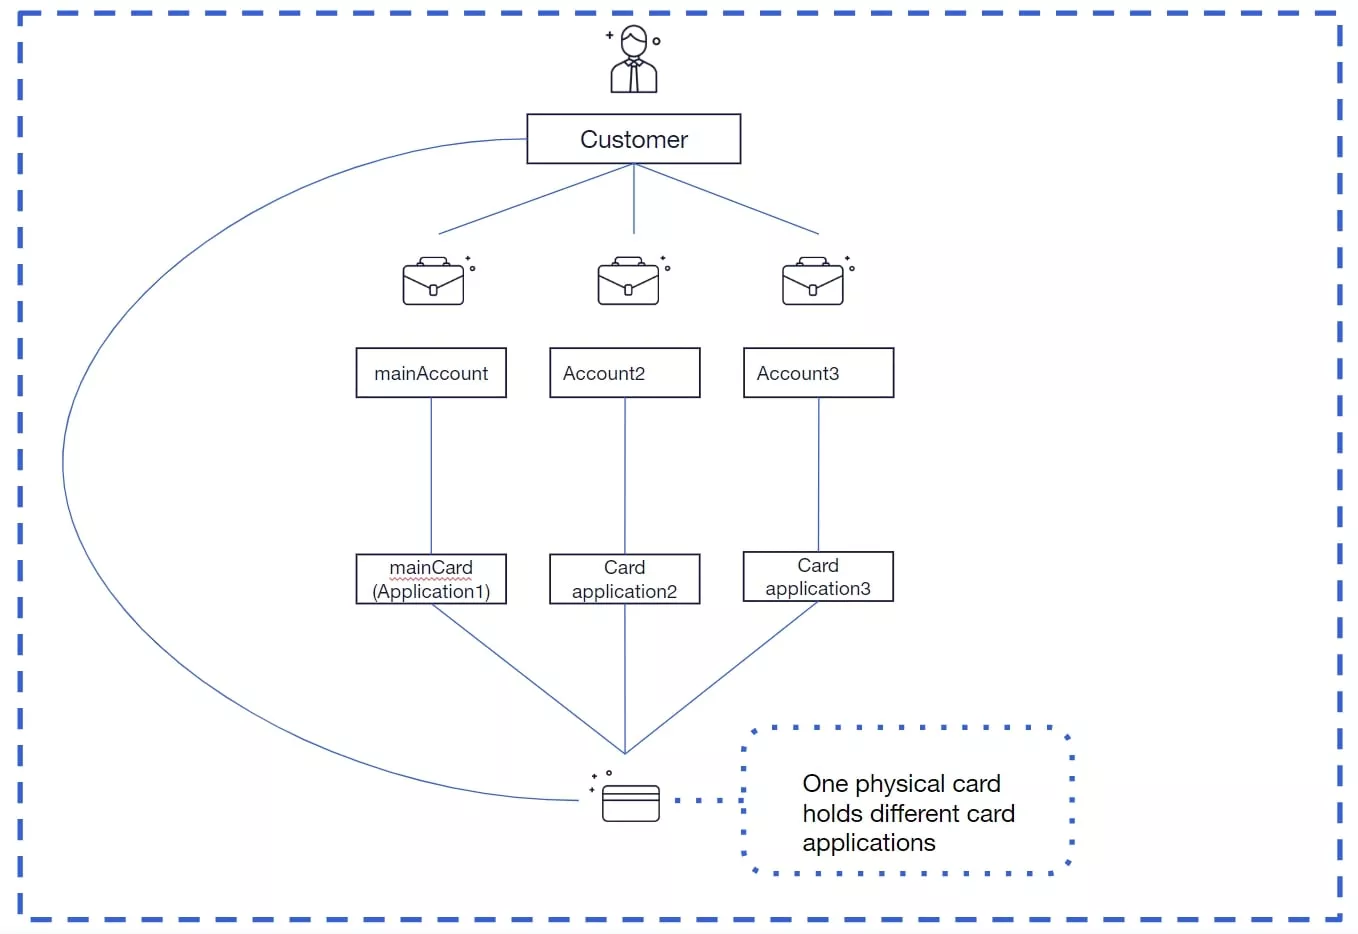
This section explains how an all-in-one card is created. There is always a mainAccount and a mainCard. This setup is required because there is a many-to-one relationship and having main entities ensures consistency.
While the mainAccount and mainCard don’t impact the card or account usage, they are relevant for card lifecycle-related actions like status changes and reissuing the card. The below chart visualises an example of a customer that has one physical card that holds three different card applications and accounts:
The process of creating an All-in-One card
- Create customer(s). Create the customer entity that will be linked to the account and card. More information can be found here.
- Create accounts for each card application. One of the accounts is defined as the mainAccount using a specific productCode. The mainAccount id is required when creating the cards (step 3). Each issuer will have designated account productCodes that are used when creating the accounts e.g. DEBIT_MAIN_GBP_GB, DEBIT_APPL1_GBP_GB. Enfuce will provide the codes during the implementation project.
- Cards are created with a single API call. You should define the card applications that are required in the API call. Additionally, the API allows you to define which of the applications are enabled from the start. Dormant applications can be activated later. Each issuer will have designated card productCodes that are used when creating the accounts e.g. MC_MAIN, MC_APPL. Enfuce will provide the codes during the implementation project.
- Set spend controls on each card application through Update a Multi-application card API.
Card application management makes the All-in-One card flexible and easy to use
The All-in-One card makes it easy for the issuer to manage different card applications (PANs) in real time, without ordering a new physical card. During the card creation, all the card applications will be created, but all of them don’t need to be enabled. For example, you can enable one application first, e.g., a lunch card, but when there is a need to add another, e.g., an expense card, your customer can request it to be added to the same physical card later on.
This enabling and disabling card applications is possible with just a single API call and subsequently completing a transaction on the card to activate the change. Making changes to the card works both ways – one of the card applications enabled can be disabled also later on – again with just a single API call and use of the card.
All of the different card management options mentioned above are using EMV script technology which works through a two-step process.
Step 1 is to send an API call to indicate what should happen (the change you want to activate) and step 2 is to prompt the requested change by completing a transaction with the card. When a transaction is done and the card interacts with the payment terminal, a chip script is sent with the authorisation response from Enfuce which prompts the change. There is no need to order a new physical card to activate new functions as the chip scripts are ‘the messengers’ that activate what is triggered with the API call.
Below are the available card application management options:
- Enabling and disabling card applications
- Choose preferred card applications for contact and contactless transactions
- Choose and update the preferred name of the card application
Enabling and disabling different card applications as a two-step process
Your customers have different needs for payment applications during the cards’ life cycle. You can manage the different card applications since the physical card can hold both active and dormant applications.
When the physical card is manufactured, there is always a pre-defined set of card applications and you (together with your customer) can choose which applications are enabled for individual cards. The active card applications can be disabled later or they can all be in use from the start. Here are some examples to describe possible use cases:
The issuer creates the following predefined set of card applications: lunch, wellness, fuel and expense card. Three employees have different needs for card usage:
- Employee A only has a lunch card enabled so employee A can use only one of the card applications.
- Employee B has lunch, wellness and fuel in use, so three applications are enabled.
- Employee C has all four card applications in use so all are enabled.
Employee A changes roles and the employer wants to also enable the expense card option for the employee. Employee B doesn’t want to have a lunch benefit so the employer disables this card application. All of these changes are possible to do with the two-step process – a single API call and one use of the card. This process is described in more detail next.
Step 1 - Enabling or disabling a card application via an API call
Enabling or disabling a card application allows you to choose which card applications are visible for the cardholder on a payment terminal. The issuer will use the Enfuce API call ‘Update an application of a multi-application card‘ and update the ‘enabled’ boolean field to true/false. This will create an issuer script and set it to wait for the next authorisation made with any of the card applications.
Step 2 - Use the card to activate the change
The next step of enabling or disabling a card application happens after the API call, by the cardholder using the card. This is the part where EMV chip technology comes to life when applications are activated in real-time.
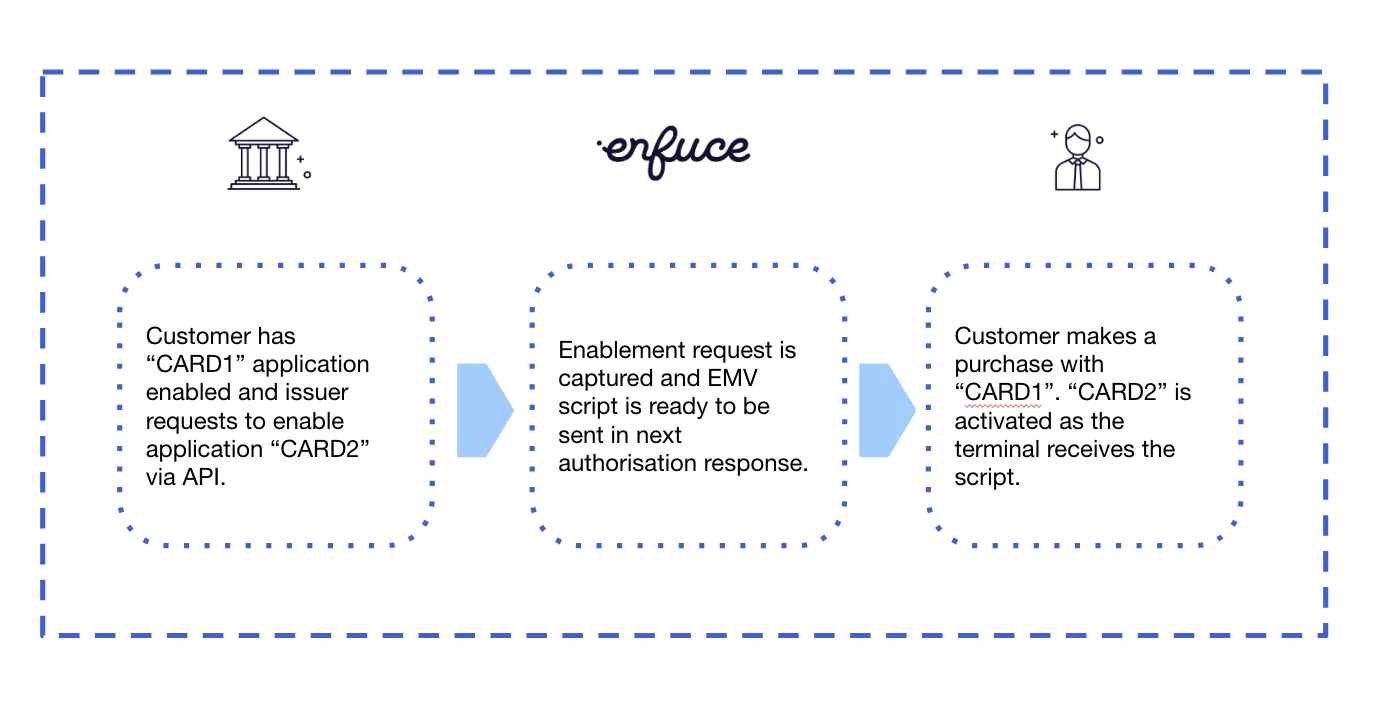
Once the issuer script is set to wait for the next authorisation and the authorisation message is received, Enfuce sends the issuer script to the card in the authorisation response message (within the ARPC (Application response cryptogram). The command in the script is processed after the authorisation, meaning that the cardholder is not able to see the results on the payment terminal until the next purchase is initiated.
In this picture, the cardholder has just one card application enabled (CARD1) and the issuer enables another one (CARD2) to be used.
Choose and update preferred card applications for contactless and contact transactions
You can define which card application is used as the default for contactless transactions and in which order the card applications are shown when doing a chip and PIN (‘contact’) transaction.
As an example, a lunch is usually under the allowed contactless limit and the user might prefer to use the contactless functionality of the card when paying for lunch. On the other hand, say that the user in addition to the lunch benefit, uses the expense management card application most, then having that on the top of the list when entering the card to a payment terminal would improve the user experience.
Both contact and contactless preferences are defined using a priority. The priority is defined in the contactPriorityLevel and contactlessPriorityLevel fields in the API. This information is sent to the embossing file which will be used by the card printer/embossing house to define the chip as preferred.
For contactless, the active application with the lowest value will be used when the user uses the contactless functionality. If the application that has contactlessPriorityLevel 1 is deactivated, then the application with contactlessPriorityLevel 2 will be used.
For contact transactions, the contactPriorityLevel will define the order in which the applications are shown in the terminal when the card is inserted into the payment terminal. The card application with contactPriorityLevel 1 will be at the top and the one with value 2 below it, and so on.
The contact and contactless preferences are defined at card creation and can be updated during the card lifecycle. Updating the preference is based on issuer scripts which is a two-step process where the update is first captured from the API call and then the actual change on the chip is completed when a transaction is done on the card.
Change the preferred name of the application
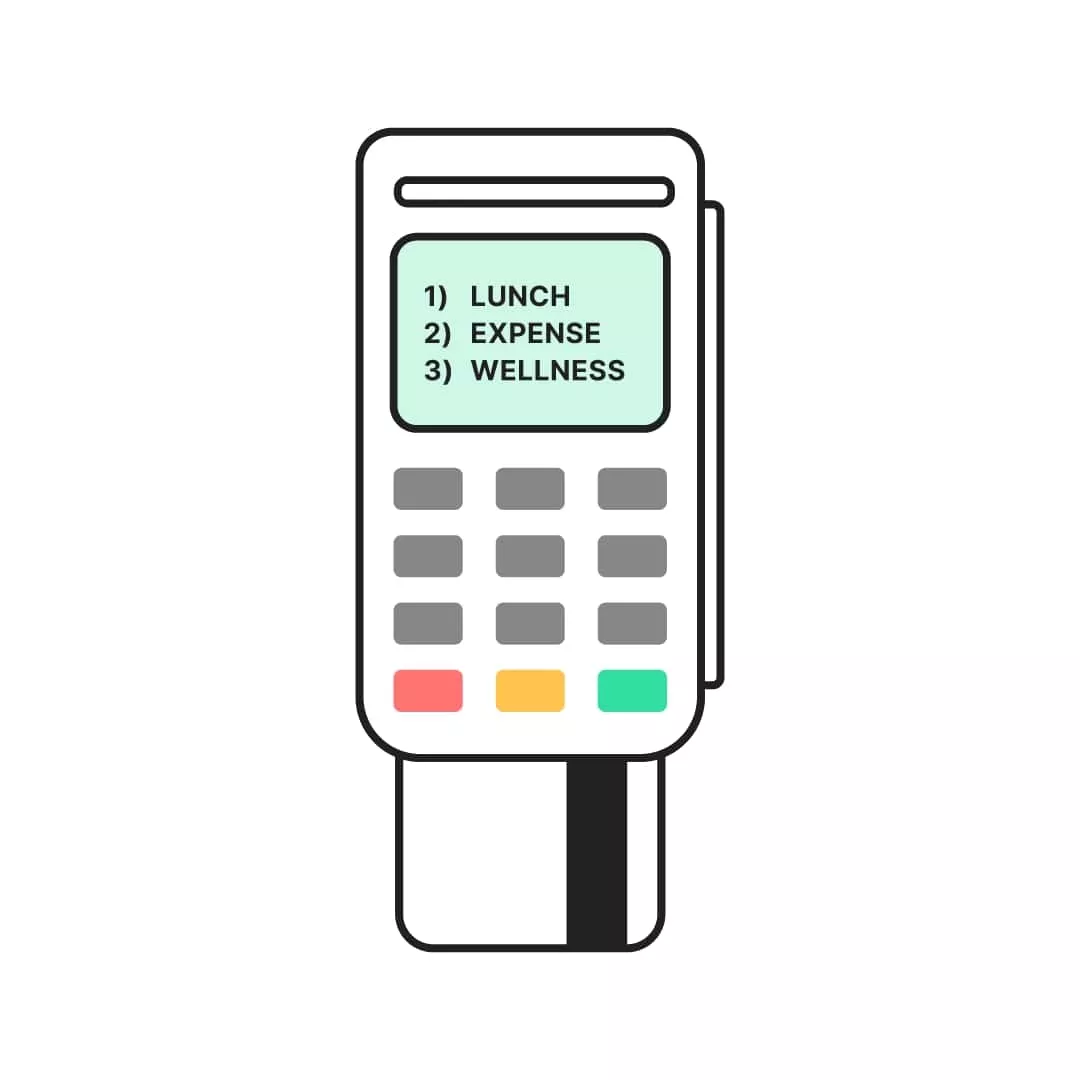
Each card application will have its application name, which is displayed on the payment terminal when making a purchase. Default values are set when the card is created. Examples of the card application names could be LUNCH, EXPENSE, and DEBIT.
The name of the application can be redefined via Update an application of a multi-application card API after creating cards. Like with other updates, the API call will create an issuer script and set it to wait for the next authorisation to be made with the card. With the authorisation response, the name is updated so that when the customer uses the card next time, the name of the application is updated.
Lifecycle management in the All-in-One card
View PIN
All cards share the same PIN. The PIN can be retrieved with any card application cardId.
View card credentials and e-commerce purchases
Each card application has its own PAN and each card’s respective cardId has to be used when retrieving card details. All-in-One card applications can be used for e-commerce purchases just like any other card. You need to agree with the card printer/embossing house if all applications’ PAN numbers and CVV codes are printed on the back of the physical card. If not printed on the physical card, the View PAN solution allows the customer to get access to the different card credentials to make e-commerce transactions.
Reissuing a plastic card
When reissuing the physical card, the id of the mainCard needs to be used in the API call. This will result in the re-issuance of all the card applications in the All-in-One card. This is required for consistency so that e.g. one application doesn’t expire before another.
Replacing a card
When replacing the card (when e.g. lost, or stolen) the id of the mainCard needs to be used in the API call. This will result in the replacement of all the card applications in the all-in-one card. This is required for consistency so that e.g. one application doesn’t expire before another.
Reorder of PIN
When reordering a PIN letter, the id of the mainCard needs to be used in the API call. The API call will trigger PIN letters for all applications. As the PIN is the same for all applications, the Issuer should align with the card printer to ensure that only one PIN letter is sent.
Card status change
You can choose if the card status changes are synchronised or not, i.e. will change of card’s status, and change the status of all other linked card applications. We will align with you during the onboarding project on this functionality.
An example of status synchronisation: All-in-One card with card applications ‘1’, ‘2’ and ‘3’ (status Card OK)
- The status of card application 2 is changed to ‘Card Lost’ via API call
- The card status of applications 1 and 3 are also changed to ‘Card lost’
It should be noted that if card applications have been set to ‘Temporarily blocked’. Reopening the cards requires that the card status is individually changed to ‘Card OK’ for each of the card applications.
Example: Card applications 1, 2 and 3 have card status ‘Temporarily blocked’
- Card status for card application 1 is changed back to ‘Card OK’ via API → 2 and 3 remain still as ‘Temporarily blocked’
General information about card and plastic statuses can be found here.
Account status changes
Account to Close
Account to Close’ status is used to terminate the account. If you opt for the synchronisation of account statuses, setting the mainAccount to ‘Account to Close’ will trigger an action to update account statuses to ‘Account to Close’. In addition, all connected cards will be set as ‘Card Blocked’.
In a setup where there is no synchronisation, each of the accounts can be closed individually. If a single account status is updated to ‘Account to Close’, it will only apply to that single account and will not impact other accounts.
Account Blocked
‘Account Blocked’ is a status for a temporary account block that prevents the approval of authorisations. Unlike ‘Account to Close’, updating the mainAccount (or any of the accounts) to ‘Account Blocked’ status will not impact other accounts.
Opening of a closed account
Please note that in case you want to discontinue the termination process and re-open all the accounts and card applications you will need to update all accounts and cards separately to ‘Account OK’ and ‘Card OK’. In other words, opening the mainAccount and mainCard will not automatically reopen all connected accounts and card applications.
General information about account statuses is available here, in the Account guide.